
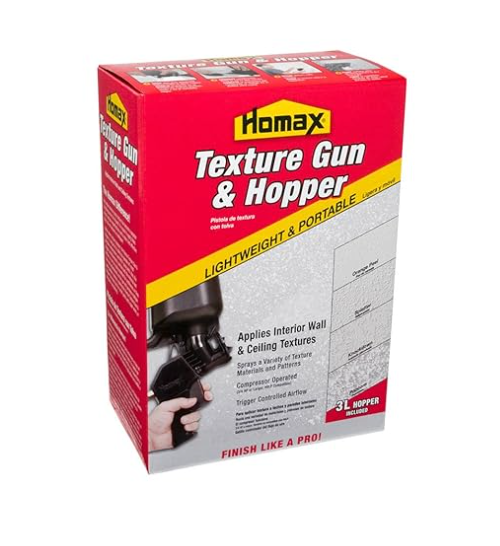
Homax Pneumatic Texture Gun and Hopper, 3L – Texturing Tool (041072046305)
- The product is manufactured in China
- The product is highly durable and handle
- Package Dimensions: 11.938 H x 28.448 L x 19.812 W (centimeters)
- Package Weight: 1.45 pounds
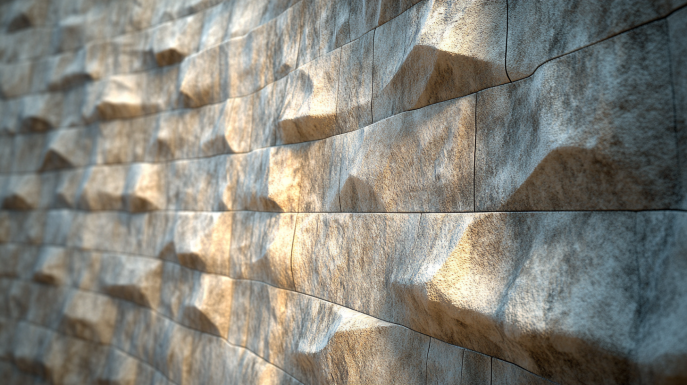
Achieve Beautifully Textured Walls and Ceilings with Ease
Have you ever admired the subtle texture on walls and ceilings and wondered how it was achieved? While textured finishes can be created using various techniques, one of the most common tools professionals use is a texture gun. These handy devices allow you to easily apply a range of spray-on textures for incredible effects on nearly any surface.
When it comes to texture guns, Homax is a leading brand used by painters, drywall contractors, and DIYers. Homax texture guns are designed to produce smooth, consistent, and uniform textures with incredible ease. If you’re looking to add interest and dimension to walls, ceilings, and other surfaces, a Homax texture gun is a must-have tool.
This buying guide will provide a comprehensive overview of Homax texture guns. You’ll learn how they work, what textures you can create, tips for usage and maintenance, and what to consider when choosing a model. Read on to discover how Homax texture guns can transform the surfaces in your home.
How Does a Homax Texture Gun Work?
A Homax texture gun is a simple but highly effective power tool. It uses compressed air to spray wet texture material onto surfaces to create a variety of textured finishes. The main components of a texture gun include:
- Hopper: This holds the texture material. It has an open top for filling and a bottom opening for releasing the material.
- Regulator: Controls the airflow and pattern pressure to achieve the desired texture.
- Nozzle: Shapes and directs the spray pattern. Nozzles can be adjusted or swapped out to create different textures.
- Trigger: Starts and stops the flow of texture material when squeezed. Allows you to maintain consistent texture application.
To operate a Homax texture gun, you first fill the hopper with premixed texture material. Common materials include knockdown, orange peel, and splatter textures. Next, you connect the gun to an air compressor and adjust the regulator to your desired pressure. Hold the gun perpendicular to the surface, squeeze the trigger, and apply even coats of texture as you move your arm in circular motions. The texture is rapidly sprayed out through the nozzle.
It’s a straightforward process, but practice and technique are needed to master achieving smooth uniform textures. Using the right spray techniques and adjusting the settings allows you to create a wide variety of professional-looking finishes.
Key Benefits of Using a Homax Texture Gun
Homax texture guns provide several advantages over applying textures by hand:
- Fast application – Texture guns allow you to coat large areas quickly and efficiently in a single pass.
- Consistent texture – They apply an even coat to reduce variations and imperfections in the finish.
- Cleaner process – Contains the spray and overspray for a tidier workflow compared to hand texturing.
- Wide range of textures – Interchangeable nozzles and adjustable settings allow you to create different patterns and textures.
- Professional results – Achieve subtle orange peel or distinctive knockdown textures like the pros.
- Labor saving – Significantly reduces the physical effort required compared to hand texturing.
- User comfort – The gun’s lightweight design reduces fatigue allowing you to texture for longer periods.
Whether you’re a pro contractor or a DIY homeowner, a Homax texture gun will help you achieve flawless results with greater efficiency and comfort.
Buying Considerations for Homax Texture Guns
Homax offers a wide selection of texture gun models with varying features and specifications. Keep the following factors in mind when choosing the right texture gun for your needs and budget:
- Air pressure – Guns operate at either high (60+ PSI) or low (20-30 PSI) pressure. High-pressure models provide more texture velocity.
- Hopper size – Larger hoppers reduce refilling frequency. Ideal for larger jobs.
- Nozzle size – Larger nozzles cover more surface area per pass. Good for ceilings or broad wall sections. Smaller nozzles provide more detail and precision.
- Adjustable regulator – Allows you to fine tune pressure as needed for the texture finish desired.
- Comfort features – Look for padded grips, triggers, and adjustable handles for more comfortable extended use.
- Durability – Commercial grade models have metal construction and stainless steel parts to withstand heavy daily use.
- Accessories – Kits include interchangeable nozzles, cleaning tools, and carrying cases.
- Warranty – Homax guns come with 1 to 3-year warranties. Extended coverage provides peace of mind.
Consider where and how frequently you plan to use the texture gun. Your needs as a professional contractor or home DIYer will help determine the right set of features.
Top Homax Texture Gun Models
Homax offers over a dozen texture gun models ranging from basic to advanced. Here are some of their most popular and highest performing choices:
- Homax 2500 – A lightweight, budget-friendly model good for small drywall jobs. It has a 1-gallon hopper and comes with 3 nozzles.
- Homax 3500 – Durable and versatile for most applications. Features include stainless steel parts, an adjustable regulator, and a comfort grip handle.
- Homax 4000 Plus – A high pressure (60 PSI) model for heavy-duty commercial use. Has a large 2.5-gallon hopper and interchangeable nozzles.
- Homax 6500 – The leading professional model. Includes advanced features like micro-adjustable pressure control, ergonomic handle, and 5 nozzle sizes for any texture.
- Homax Banjo – Unique handheld design with a push lever instead of trigger. Requires less pressure and delivers consistent texture beads.
There are also specialty models like the handheld Homax Orange Peel gun for small touch-ups and repairs. Consider the features that align best with your experience level, usage needs, and budget.
Using Your Homax Texture Gun
Once you’ve selected the right Homax texture gun for your projects, proper technique is required to achieve beautiful finished textures:
Preparation Tips
- Cover floors, furniture, and trim with plastic sheeting to protect surfaces and contain overspray.
- Fill any cracks or imperfections in the walls with joint compound and sand smooth. Repair any damaged drywall.
- Remove any existing glossy paint or coatings so the texture adheres properly.
- Mask around edges and ceilings with painter’s tape for clean defined texture edges.
Operation Tips
- Always follow all safety instructions provided with your texture gun. Wear protective goggles and a respirator or mask.
- Connect to an air compressor that meets the required CFM and PSI ratings for your gun.
- Load the hopper with premixed texture material. Avoid overfilling.
- Hold the gun perpendicular to the surface at the recommended distance. Start spraying off the wall to test the pattern before applying texture.
- Apply texture using smooth, overlapping circular motions. Apply an even coat over the entire surface, maintaining consistent speed and overlapping by 50%
- For heavier build, spray two coats allowing the first coat to fully dry before the second application.
Troubleshooting Issues
- Clogs – Clear any clogs in the hopper outlet or nozzle. Check for dried texture material.
- Uneven texture – Adjust nozzle distance, change spray direction, or apply more uniform passes.
- Drips/runs – Texture is too wet. Allow it to dry to a thicker consistency before spraying.
- Overspray – Reduce pressure, adjust nozzle distance, or use cardboard as a spray shield.
Practice your technique on boards or cardboard before tackling walls and ceilings to get familiar with your new texture gun. Patience and a bit of experimentation will pay off in beautiful results!
Popular Texture Finishes to Try
The real beauty of a Homax texture gun is the variety of finishes you can create. Simply switching out nozzles and adjusting regulator pressure allows you to achieve different patterns and textures. Here are some popular options:
Knockdown Texture
A classic decorative finish with deep peaks and valleys. Apply thick texture in circular motions then flatten peaks using a knockdown knife. Provides a mottled Look with dramatic shadows and dimensions.
Orange Peel Texture
Named for its similarity to orange peel skin. Creates a granular stipple effect by forcing the texture through a fine mesh screen nozzle. Provides a subtle design perfect for walls and ceilings.
Splatter Texture
For a mottled effect, splatter texture is applied by flicking the gun in random motions instead of circles. Creates varied texture depths with shadows and contrast. Has an artistic, funky look.
Popcorn Texture
Affectionately called “cottage cheese ceiling”, it has a bumpy finish. Combines a swirled texture application with particles in the mix that produce raised bumps. Offers a heavily textured result.
Experiment with spraying techniques, nozzle sizes, and air pressures to invent your own unique textures. Get creative with two-tone designs, incorporating glitter or colored sand, and even adding stencils over the texture.
Cleaning and Maintenance of Texture Guns
Proper cleaning and maintenance will keep your Homax texture gun spraying flawlessly for years. Here are some tips for keeping it in top condition:
- Always clean your gun immediately after each use before texture material has time to dry and clog the inner mechanisms.
- Fill the hopper with clean water and spray it through the gun over a scrap surface until the water runs clear.
- Use the included cleaning tools or a soft brush to gently clear any dried texture from the hopper, regulator, or nozzles.
- Lubricate o-rings periodically with non-petroleum-based lubricant to prevent drying out and cracking.
- Inspect parts like the regulator and couplings. Tighten any loose connections. Replace damaged gaskets or seals promptly.
- Occasionally disassemble the gun fully and clean each component thoroughly to remove all residue.
- Store the gun upright and ensure all remaining moisture dries fully before storage to prevent corrosion.
- Follow maintenance guidelines in the instruction manual for replacing worn parts like nozzle tips over time.
Proper care and cleaning extends the lifespan of your Homax texture gun and ensures it’s ready to tackle your next texturing project with ease. Maintain investment in your tool and it will continue producing beautiful textures for years.
Transforming Walls and Ceilings with Texture
As you can see, Homax texture guns are the preferred tool of professionals and DIYers alike for applying spectacular spray-on finishes. With minimal investment, proper technique, and a bit of practice, you’ll be amazed at the dramatic effects you can achieve.
Not only are textured walls and ceilings beautiful to look at, they also help hide defects in existing drywall. Popcorn ceilings can cover unsightly cracks and imperfections. Knockdown finishes add depth and interest to otherwise bland wall surfaces. The versatility and ease of use makes a Homax texture gun a wise addition to any contractors or homeowner’s toolkit.
Skip the mess and tedious labor of hand texturing in favor of a Homax texture gun. Choose a model suited to your needs and budget and you’ll be on your way to enhancing walls and ceilings with beautiful texture finishes. Let your imagination run wild as you experiment with various nozzle adjustments and spray techniques to achieve your perfect textured look.